


I owe two HUGE shout outs. The first: My cousin Amber. She has refurbished (what seems like) a million pieces and each one looks flawless. So of course, I was a never ending basket of questions for her. Seriously. I had to of called or texted her at least 500 times to ask her about spray guns and paint and sanding and so many other things. And, like always, she helped me and was so nice and encouraging. It made the entire process that much easier. Thanks Amber!! And secondly, a shout out to my husband Jake. I really thought he was going to hate me by the time this project was done but thankfully he doesn't. I asked him just as many questions and I made him do some of the staining and spraying because, well, we have kids and I wasn't going to let this project sit in the garage for 5 months partially finished. So he helped me out a ton too. They both made this project possible. So here's all the details.....
Now, on to the dresser. I had been on the hunt for a buffet for in our dining room for awhile now. But the dang things are just so expensive. There was no way we were fitting a $500 buffet into our budget. So on to Craigslist I searched. After a couple of days, I finally found one. It has a really nice mirror with it and I plan on refinishing that shortly to hang in one of our hallways. But the dresser/mirror combo wasn't local. In fact, it was about 45 minutes away from our house. And after a little while, Jake caved and agreed to go with me to pick it up. So we went out on a Sunday afternoon and got it. It was super heavy so I'm glad that I brought Jake along, and he thought it was best to bring our utility trailer.

Once we had it all strapped on, we made our way to Lowes to pick out paint. I knew I wanted a medium grey shade. We decided on Sherwin Williams "Armitage Grey" color. I thought it was the perfect grey that I was looking for. While we were there, we also picked up some "Flood- Floetrol paint thinner" to thin out our paint.


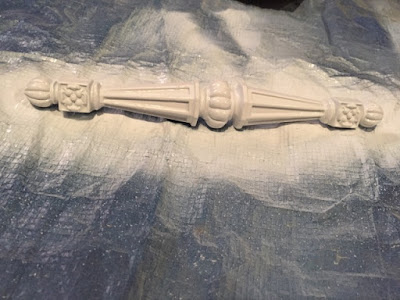
First things first, we unloaded this beaut into our garage and set up shop to get this thing looking amazing again. I took off all of the hardware - and SAVED it. I wanted to use the original hardware because I liked how it looked. I guess you could use new hardware if you wanted to; you might just have to fill the original hardware holes with wood glue or filler if they aren't going to be the same size. Also, the dresser that I got has a door on the front that opens up to more drawers, so I took the door off as well and all of that hardware. I also took out all of the drawers and set up a station on a folding table to work on them separately.


Next, it was time to sand. I can't express enough how important this step is. You have to give your primer and paint a good surface to adhere to and the best way to do this is to give everything a really good sanding. I used an electric hand sander on the large, flat surfaces and then used a rough sand paper by hand in all of the small, detailed areas that a hand sander couldn't get to. After that, I wiped the whole thing down with a damp cloth to get all of the sanding dust off.

On to priming. We bought a paint spray gun from Harbor Freight for $16 and I swear, it's one of the best investments we've ever made.

It made this project go by so much quicker and I think it made the paint look so much more professional. They are totally worth it! Although make note that when you use a paint spray gun, it is best to thin out your paint so that it sprays better.

We used regular, good old KILZ premium primer and thinned it down with some water. (Your primer should have a recommended amount to use when thinning that will be listed in the directions.) We suggest you use some old cardboard and test out your spray gun to get the hang of things and the right amount of paint flowing before you actually start on your project piece. They do say practice makes perfect, right? We did one good coat of primer and then let it dry. Because we used the paint sprayer, it dried fairly quickly.


Time to paint! The directions that were on the back of the paint can for thinning were really confusing; so I basically had to do a lot of trial and errors with measurements. For our paint sprayer, I found that our perfect measurements was: filling our paint sprayer bottle halfway with paint, adding two tablespoons of water and two tablespoons of the Flood Floetrol paint thinner. Then I mixed it all up real good before putting the spray gun all together. Remember: test your sprayer out on an old piece of cardboard before you go spraying your project piece. Once we got the spray gun rocking and rolling; it was go time. I - yes I - (I didn't even let Jake do this part because I thought the spray gun was so cool and I insisted on doing it myself) - started spraying away. The dresser and then onto the drawers. To do it all, it took maybe 10 minutes. Then we cleaned up and headed inside for the night to let it dry.


The next day, I woke up in the morning and I sanded with a very light piece of sand paper to prep it for the next coating of paint. And then I sprayed it all over again. This time, I made sure to really take my time and get a good, even coat - as this would be the final coat of paint. After I was done, I left it to dry for the rest of the day.
Now on to the hardware. Give it a good washing. I just used Dawn dish soap and hot water. I wasn't too worried about what it looked like because I knew I was spray painting them. Once they were fully dried, I sprayed them all with white matte spray paint. It only took about 30 minutes to dry before I moved them and spray painted them again, making sure to get all the angles and giving it a good coat. This next time I waited a good couple of hours to really let it dry. Then I sprayed them with a Polycrylic protective finish clear gloss top coat and let it dry.

After letting the dresser dry, I came back outside and went on to sanding the top. I didn't think things through at the beginning (If I had, I would have tapped off the top to avoid any paint getting sprayed on it - but I didn't think of that) so I had to sand off all of the excess paint that got sprayed onto it. The good part was that I was able to use the hand sander so it went by pretty quickly.
Once I was done sanding, it was time to stain the top. I wiped it all off with a damn cloth to get the sanding pieces off. Then, I doubled up on disposable rubber gloves and got an old towel that I ripped up into a couple pieces. We decided on Minwax Polyshades Espresso colored stain because it is the same stain that is on our dining room table and I wanted it to match. We bought the polyshades because it has stain and polyurethane in one, and we bought it in gloss finish. I shook the stain up really good and then opened it. Next, I dunked about 2-3 inches of the towel into the stain and rang it out a little bit. Then I went to staining. It is best, when staining, that you only run along the wood grain. So I continuously ran the towel back and forth, from side to side, following the natural grain in the wood. I did this over and over; re-dunking my towel into the stain when needed. Stain goes a long way, you don't need a lot. And you don't want to cake your stain onto it, you really want the wood to absorb the stain so you have to be patient and really take your time. After the entire top was done with the first round of stain, I let it dry over night.


Time to paint! The directions that were on the back of the paint can for thinning were really confusing; so I basically had to do a lot of trial and errors with measurements. For our paint sprayer, I found that our perfect measurements was: filling our paint sprayer bottle halfway with paint, adding two tablespoons of water and two tablespoons of the Flood Floetrol paint thinner. Then I mixed it all up real good before putting the spray gun all together. Remember: test your sprayer out on an old piece of cardboard before you go spraying your project piece. Once we got the spray gun rocking and rolling; it was go time. I - yes I - (I didn't even let Jake do this part because I thought the spray gun was so cool and I insisted on doing it myself) - started spraying away. The dresser and then onto the drawers. To do it all, it took maybe 10 minutes. Then we cleaned up and headed inside for the night to let it dry.


The next day, I woke up in the morning and I sanded with a very light piece of sand paper to prep it for the next coating of paint. And then I sprayed it all over again. This time, I made sure to really take my time and get a good, even coat - as this would be the final coat of paint. After I was done, I left it to dry for the rest of the day.
Now on to the hardware. Give it a good washing. I just used Dawn dish soap and hot water. I wasn't too worried about what it looked like because I knew I was spray painting them. Once they were fully dried, I sprayed them all with white matte spray paint. It only took about 30 minutes to dry before I moved them and spray painted them again, making sure to get all the angles and giving it a good coat. This next time I waited a good couple of hours to really let it dry. Then I sprayed them with a Polycrylic protective finish clear gloss top coat and let it dry.


After letting the dresser dry, I came back outside and went on to sanding the top. I didn't think things through at the beginning (If I had, I would have tapped off the top to avoid any paint getting sprayed on it - but I didn't think of that) so I had to sand off all of the excess paint that got sprayed onto it. The good part was that I was able to use the hand sander so it went by pretty quickly.
Once I was done sanding, it was time to stain the top. I wiped it all off with a damn cloth to get the sanding pieces off. Then, I doubled up on disposable rubber gloves and got an old towel that I ripped up into a couple pieces. We decided on Minwax Polyshades Espresso colored stain because it is the same stain that is on our dining room table and I wanted it to match. We bought the polyshades because it has stain and polyurethane in one, and we bought it in gloss finish. I shook the stain up really good and then opened it. Next, I dunked about 2-3 inches of the towel into the stain and rang it out a little bit. Then I went to staining. It is best, when staining, that you only run along the wood grain. So I continuously ran the towel back and forth, from side to side, following the natural grain in the wood. I did this over and over; re-dunking my towel into the stain when needed. Stain goes a long way, you don't need a lot. And you don't want to cake your stain onto it, you really want the wood to absorb the stain so you have to be patient and really take your time. After the entire top was done with the first round of stain, I let it dry over night.


The next morning, I came out and sanded the top with a 220 grit sandpaper. Just enough to get it a little rough so the next coat had something to adhere to. Then, I did the same staining process all over again to add more stain. The best part about stain is you have to work in steps so you can decide just how light or dark you want to go. After applying the second coat and letting it dry, we decided that we liked the color of the stain where it was and that was our last coat of stain.

Last but certainly not least, it was time to put on a top coat. Jake thought it was best to use Minwax water based Polycrylic protective finish clear satin top coat so that's what we decided to use. He made the decision to "yolo" it and apply the top coat with the paint sprayer gun. It was reallyyyyyyyy strong so we opened up the garage doors and I stayed inside because it was that strong. So next time, I would suggest applying it with a brush instead. But he used the spray gun and it worked! He did two coats of top coat and we let it dry for 24 hours.

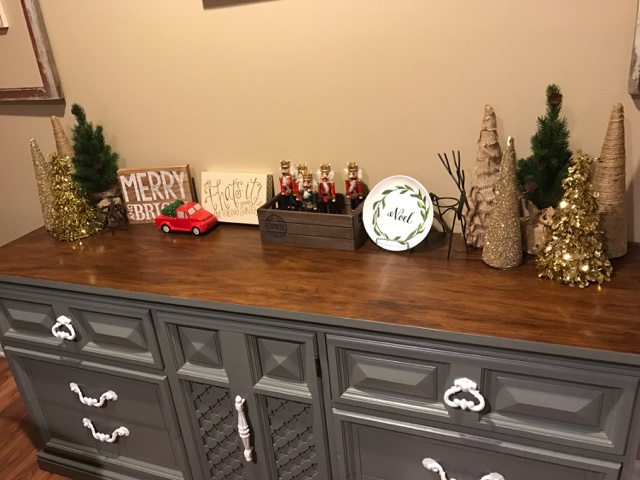
We brought it inside and put it where we wanted. Then it was time to install all of the hardware back on.

Once all of that was on, I put the drawers back in their spots and stepped back to take a look.

YESSSSSSSSSSSSS!!!!!!!
HOLY SMOKES; DID I DO THAT??
It is such an amazing feeling knowing that YOU worked on something so much to make it so beautiful!


I stood in amazement for maybe 2 minutes before I had to start decorating it for Christmas! The best part of the year; Christmas decorating! When I got all of my favorite things on there, I was even more in love with it! It isn't perfect, and it isn't Art Van worthy, but it is something that I worked hard on, something that I'm proud of, that I love, and something that works great for our family! I just love my dresser-turned-buffet!


I can't wait to start on more projects. I plan on painting our kitchen cabinets and we have plans to remodel our master bathroom and I plan on refurbishing an old buffet into a bathroom vanity. But I'm sure those will also be worthy of their own posts so watch out for those! Have you refurbished anything?? Show me a pic and let me know how your project went! Also, I'm always up for tips and tricks!
Have a blessed Sunday!
- Christine
Disclaimer: I was not obligated in any way to review or share the products that I used with you and I am not being compensated to mention them.

YESSSSSSSSSSSSS!!!!!!!
HOLY SMOKES; DID I DO THAT??
It is such an amazing feeling knowing that YOU worked on something so much to make it so beautiful!


I stood in amazement for maybe 2 minutes before I had to start decorating it for Christmas! The best part of the year; Christmas decorating! When I got all of my favorite things on there, I was even more in love with it! It isn't perfect, and it isn't Art Van worthy, but it is something that I worked hard on, something that I'm proud of, that I love, and something that works great for our family! I just love my dresser-turned-buffet!

I can't wait to start on more projects. I plan on painting our kitchen cabinets and we have plans to remodel our master bathroom and I plan on refurbishing an old buffet into a bathroom vanity. But I'm sure those will also be worthy of their own posts so watch out for those! Have you refurbished anything?? Show me a pic and let me know how your project went! Also, I'm always up for tips and tricks!
Have a blessed Sunday!
- Christine
Disclaimer: I was not obligated in any way to review or share the products that I used with you and I am not being compensated to mention them.
No comments:
Post a Comment