


Growing up, my mom decorated our house from top to bottom at Christmas time. She has the eye for tiny, little details and always knows exactly where to put that extra "something" to make things look perfect. This is our first Christmas in our very first home and I was DETERMINED to make our house into the perfect winter wonderland (thanks, mom). But with being on a budget, I had a lot of work ahead of me when it came to DIYs.
Throw pillows are always the perfect way to top of a room with that added seasonal "touch". Whether it's in your living room, your bedroom, or maybe on a front entry way bench, they're the types of little things that make a house into a home (and give your room that added "magazine quality" look - am I right?). But they can be obnoxiously expensive. Seriously. I went to Home Goods the other day. Yes, usually you can find a lot of great deals at Home Goods, and trust me, I do. But when I was strolling through the decorative pillows, I almost died looking at the price tags. You want me to spend $29 on ONE throw pillow? Do you know all of the things I can get for $29? A case of diapers. Two cases of wipes. Six grande caramel brûlée lattes from Starbucks. I mean, the list goes on and on. Not to mention the fact that Jake would probably kill me if he ever found out I spent that much on one stinking pillow that I'm going to yell at him about laying his sweaty head on while he watches football on a Saturday. (Of course I would yell at him, that's a $29 pillow). So, as I kissed my throw pillow dreams goodbye, I headed home. And on that ride home, I started thinking. And once I got home, I started Pintresting. People make pillows out of everything, I swear. Old clothes, blankets, tablecloths, curtains. The pins were never ending. And everything called for sewing, and well, unfortunately I wasn't blessed with my Grandma's sewing genes. I can barely thread a needle, let alone use a sewing machine. So once again, I kissed my pillow dreams goodbye. Then one random day while scrolling through a Facebook group that I'm a part of, I saw a post about a lady who used placemats as pillows. Of course she sewed them back together and I got annoyed and exited out of the post and went to go do the dishes. Then, in the middle of soapy bottles and hot water, I had this crazy idea to use a hot glue gun. I knew this could be risky but I decided I had to attempt it.
I ventured out to Target. Of course. It had to be Target. One, because I'm obsessed. And two because, well, have you SEEN their Christmas decor this year? AH-MAZE-INGGGGGGGGG!!!! They have SOOOOO much stuff. Seriously, if you haven't gone and spent at least an hour obsessing over every single thing there, get on it! Anyways, off to the Home section. They had SO many placemats. Seriously tons. And they were pretty decently priced. One placemat was $4.99 but at the time, they were on sale on their Cartwheel App for $4.25. (If you don't have the Cartwheel App - download it NOW). And then even on top of that, I had a coupon for $10 off any $15 purchase, and I have the Target Red Debit Card so you get 15% off of every single purchase. Basically - Target is my best friend and once again, came through for me to give me a GREAT deal!! So with that good of a deal, I ended up picking up 3 placemats (and a couple packs of gum to push me over that $15 mark so I could use my coupon) and I only ended up spending a couple bucks for all of them!
Then I headed over to JoAnn Fabrics to get the pillow "filling". I spoke with an employee there and she suggested using a polyester fiber fill because it doesn't bunch up and it's washable. So that's what I went with. And if you are a shopper, you know that there are always some type of sales going on at JoAnns or Michaels and you can always find coupons online for them. I picked up 2 (2lb each) bags. I know it seems like a ton of filling, but I used a whole bag and a little bit from the second bag on my three pillows. They were originally $12.99 each, but they were 40% off so I paid under $17 for both (and I still have enough fill left to do two more pillows so you know I'll be heading out to Target this weekend to get me some more placemats)!
And then, I set home to start my project. It took MAYBE 20 minutes from start to finish for me to do all three pillows. It's taking me longer to write this post! And being a mom of two toddlers, I can only distract them for so long without them wanting to see exactly what I'm doing and to start "helping". Easton did "assist" me with stuffing one of the pillows, so I think this would be a great project if you had kids that were a little older. Maybe let them pick out their own placemats and they can do their own pillows. Super quick project that you are guaranteed to love!
DIY Decorative Throw Pillow!
Materials:
- Placemat
- Fiber Fill
- Hot Glue Gun & Glue Sticks
- Small Scissors or Box Cutter
* I will post links below of the exact materials that I used *

Directions:
Remove the price tags from your placemat and plug in your hot glue gun so it can heat up.

Using the small scissors (which is what I used) or the box cutter, cut a tiny part of the thread that is holding the front and back pieces together. I cut mine on the bottom, but you really could cut the top or either side, I don't think it matters.
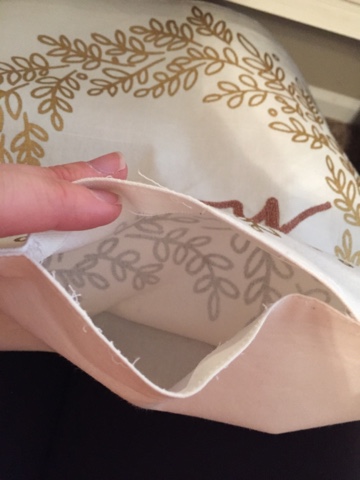
Continue to carefully cut an opening that is just large enough for you to get your whole hand in there.

Now for the fun part - take that fiber fill and start stuffing....

.... and stuff ....

.... and stuff ....

.... and stuff!!!
Make sure you get into all the corners and stuff that baby until it's nice and fluffy! Once you got it fully fluffed, it should look something like this:

Now, on the inside of your placemat there should be a small overlay of fabric that looks like this:

That is where you are going to put the glue at. I worked with about an inch at a time. Put a small line of hot glue on and then pinch the two pieces of fabric together and hold it for about a minute to insure that the glue is binding both pieces together.


Continue to do this in small sections at a time until the entire hole is glued back together.

I then took a small pair of scissors and trimmed up any tiny pieces of thread that were hanging and any large pieces of glue that maybe squeezed out.

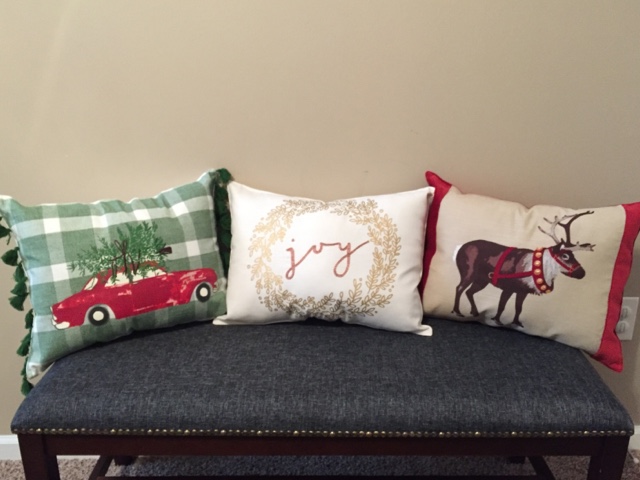
Time to fluff things up again to spread out all of the fiber that's inside. And finally..... throw that pillow on your couch or bench, sit back, and enjoy the beautiful masterpiece that you just made! (And high-five your bank account for all the money you saved!)

Links to specific items that I used:
(This link is for a 16oz bag from JoAnn Fabrics; I used a 32oz bag but only the 32oz bags are available in stores)
This project was cheap and seriously only took a couple of minutes! It's the perfect way to add a little something extra to your rooms for all the different seasons. They have placemats for everything so you can do so many different ones and switch them out often! You could even make some and give them as gifts! I hope you try your hand at a couple and if you do, please let me know how it goes and send me some pics!
Happy decorating!
- Christine
Disclaimer: I was not obligated in any way to review or share the products that I used with you and I am not being compensated to mention them.
Disclaimer: I was not obligated in any way to review or share the products that I used with you and I am not being compensated to mention them.